
Follow this step-by-step guide to learn the process of creating an online course in CreativeMindClass, a free tool used by top creators.
How to create an online course in 5 quick steps
An effective way to create online course is a combination of great video content and a website that sells it.
Illustrators, writers, photographers, fitness instructors, coaches and all types of professionals create online courses to serve their audience with skills and knowledge. It can be a source of additional income or the main occupation.
But online courses have come a long way since the days of sending emails with PDFs or sending videos in messages. Online courses have the ability to include videos, downloadable files, exercises, and feedback, receive payments and build an online community—unlocking a whole new word of possibilities to build an online business.
In this guide, you'll learn the essential steps to creating a successful online course using CreativeMindClass...
1. Online Course Plan
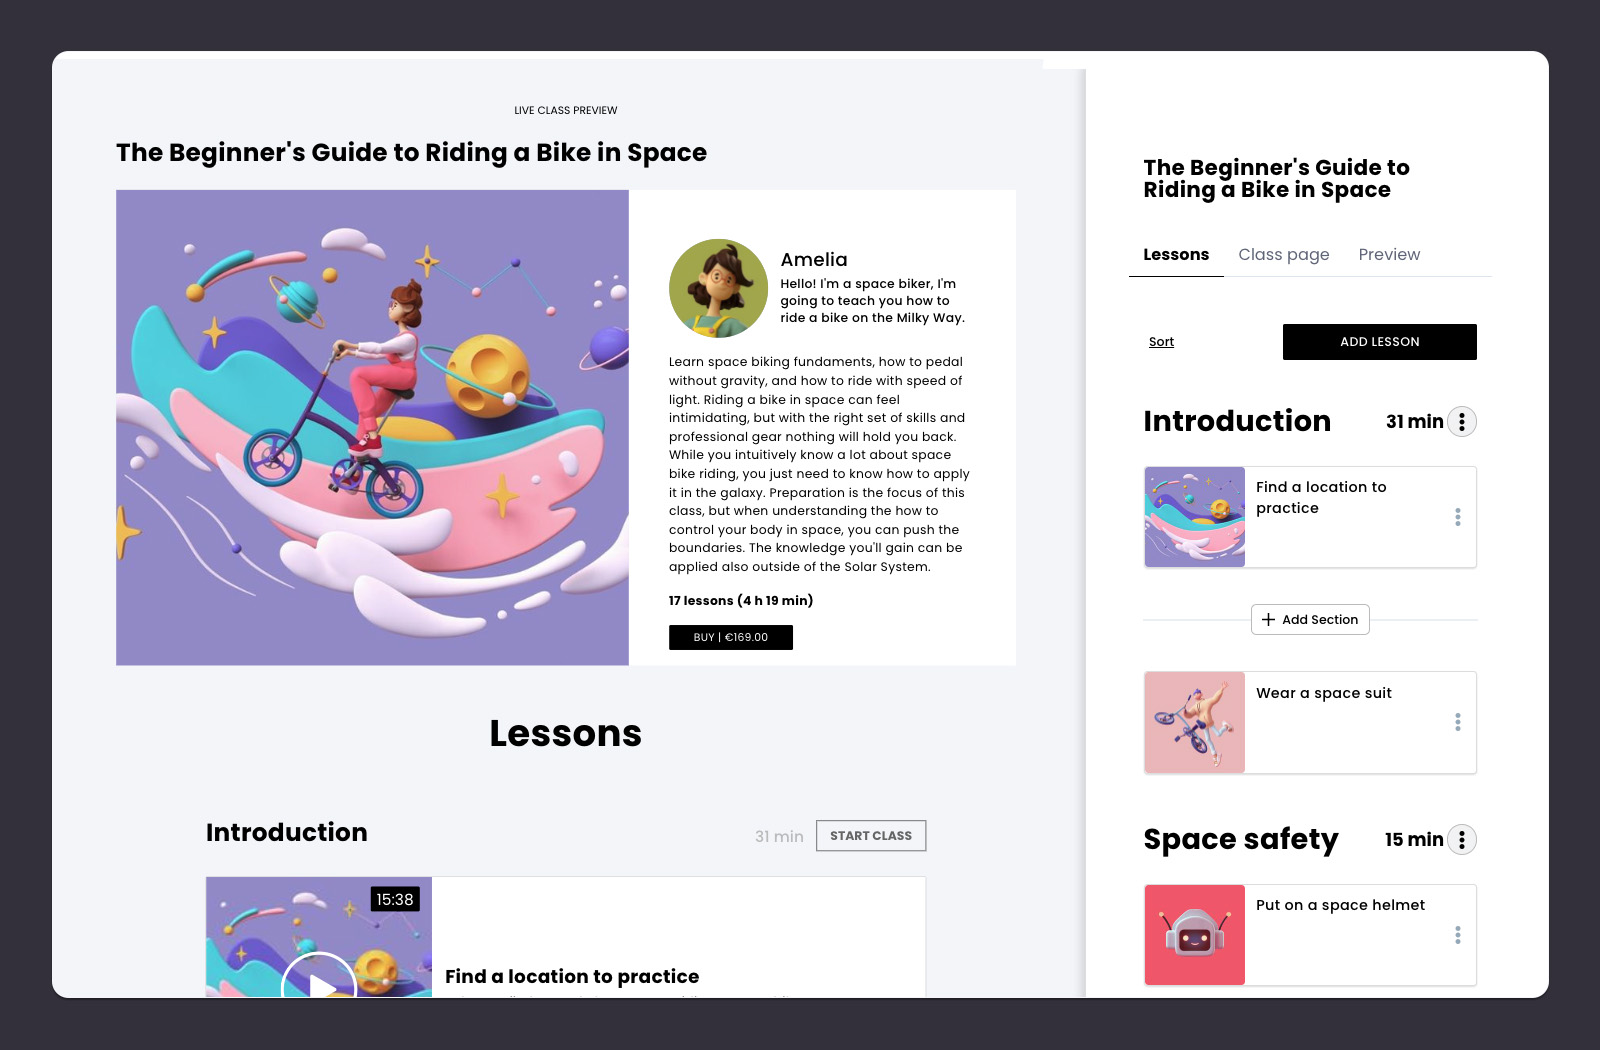
Set up a place to create your online course
Traditionally, an online course might be scattered across various social media, websites, payment pages, messages, e-mails, and laptop folders. A central online course combines those into one easy-to-access place. It will evolve over the lifespan of your online course but usually includes:
- Introduction
- Materials/Equipment information
- Inspiration
- Planning
- Class project
- Summary

How to do it in CreativeMindClass
- Click My Classes in main menu to open it.
- Click ADD CLASS button to create a new course.
2. Course topic
Figure out what and who you'll teach.
Beginning your online course could be stressful, as you must think of something that people are likely to buy. But a well-chosen course topic can set you up for success.
An online course topic is a simple and powerful idea to create the ideal course for your students.
You're passionate; you've got the knowledge, skills, and expertise that your audience will spend money on. Now is the time to take a closer look and translate it into words.
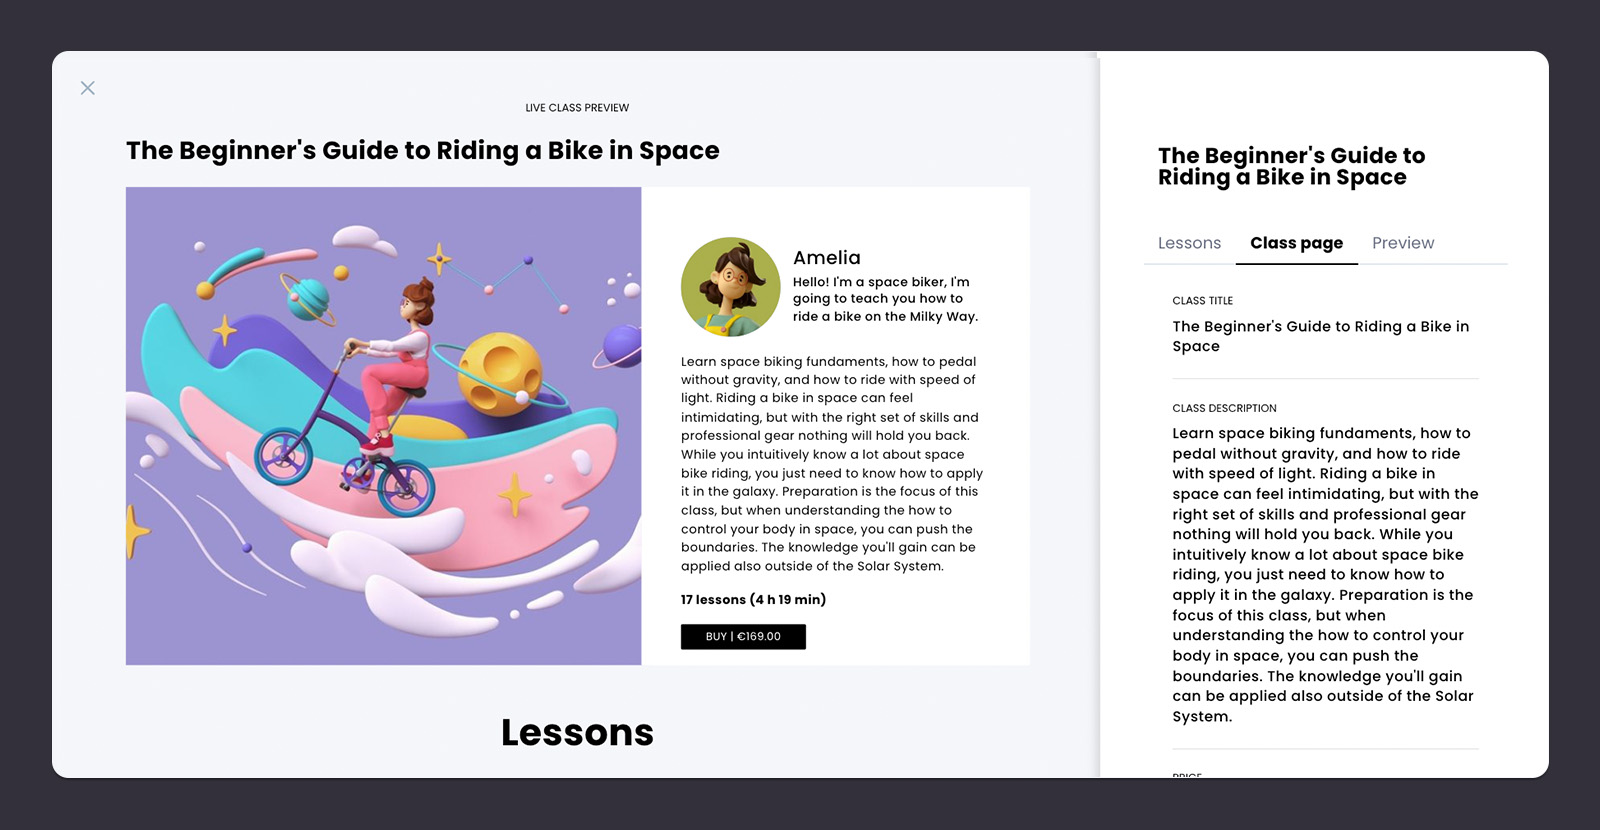
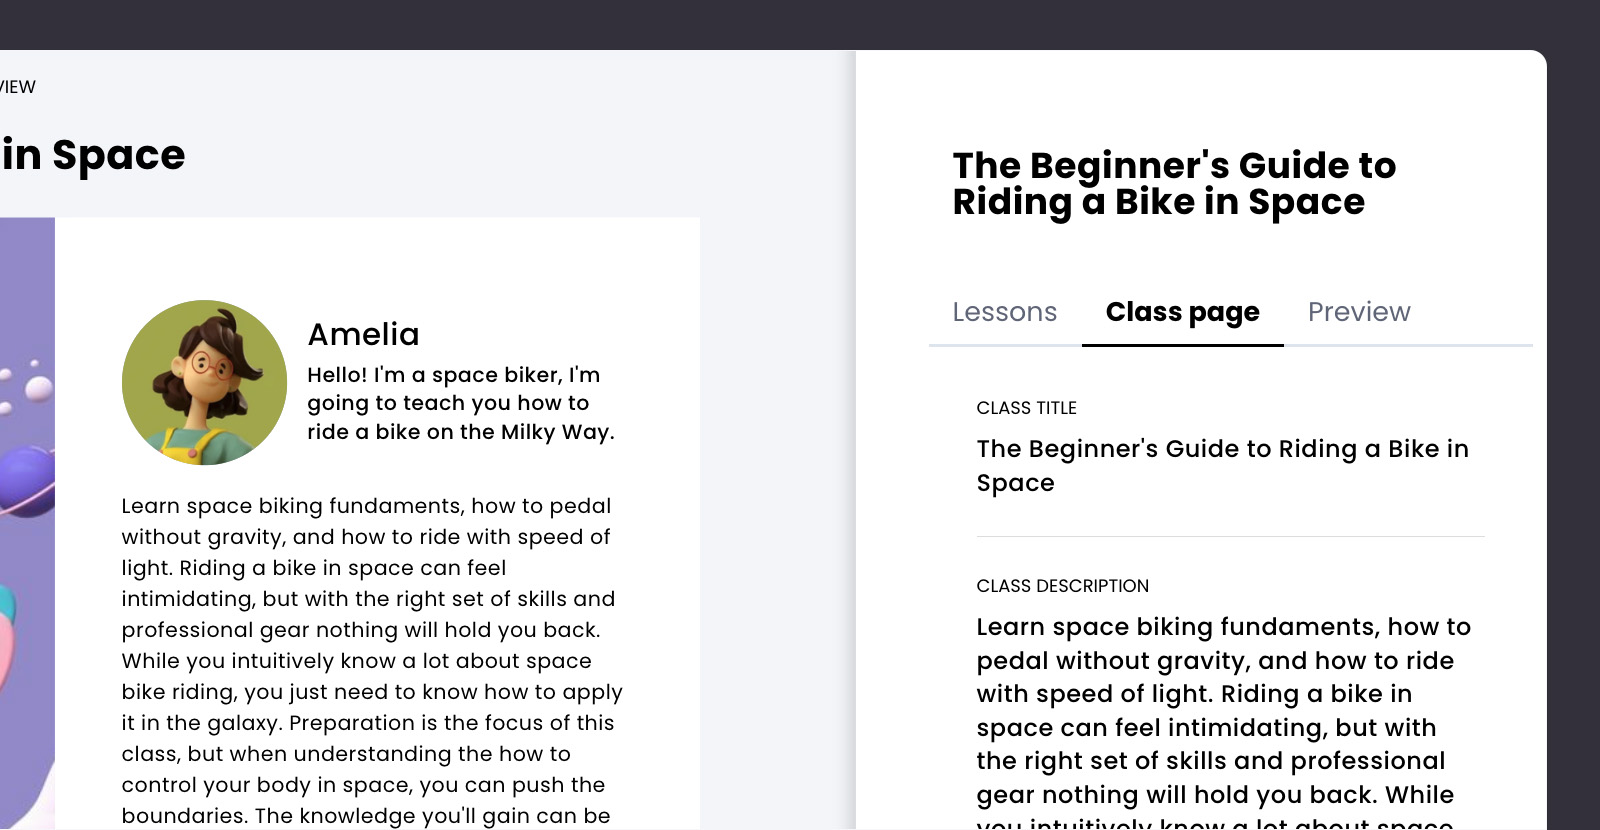
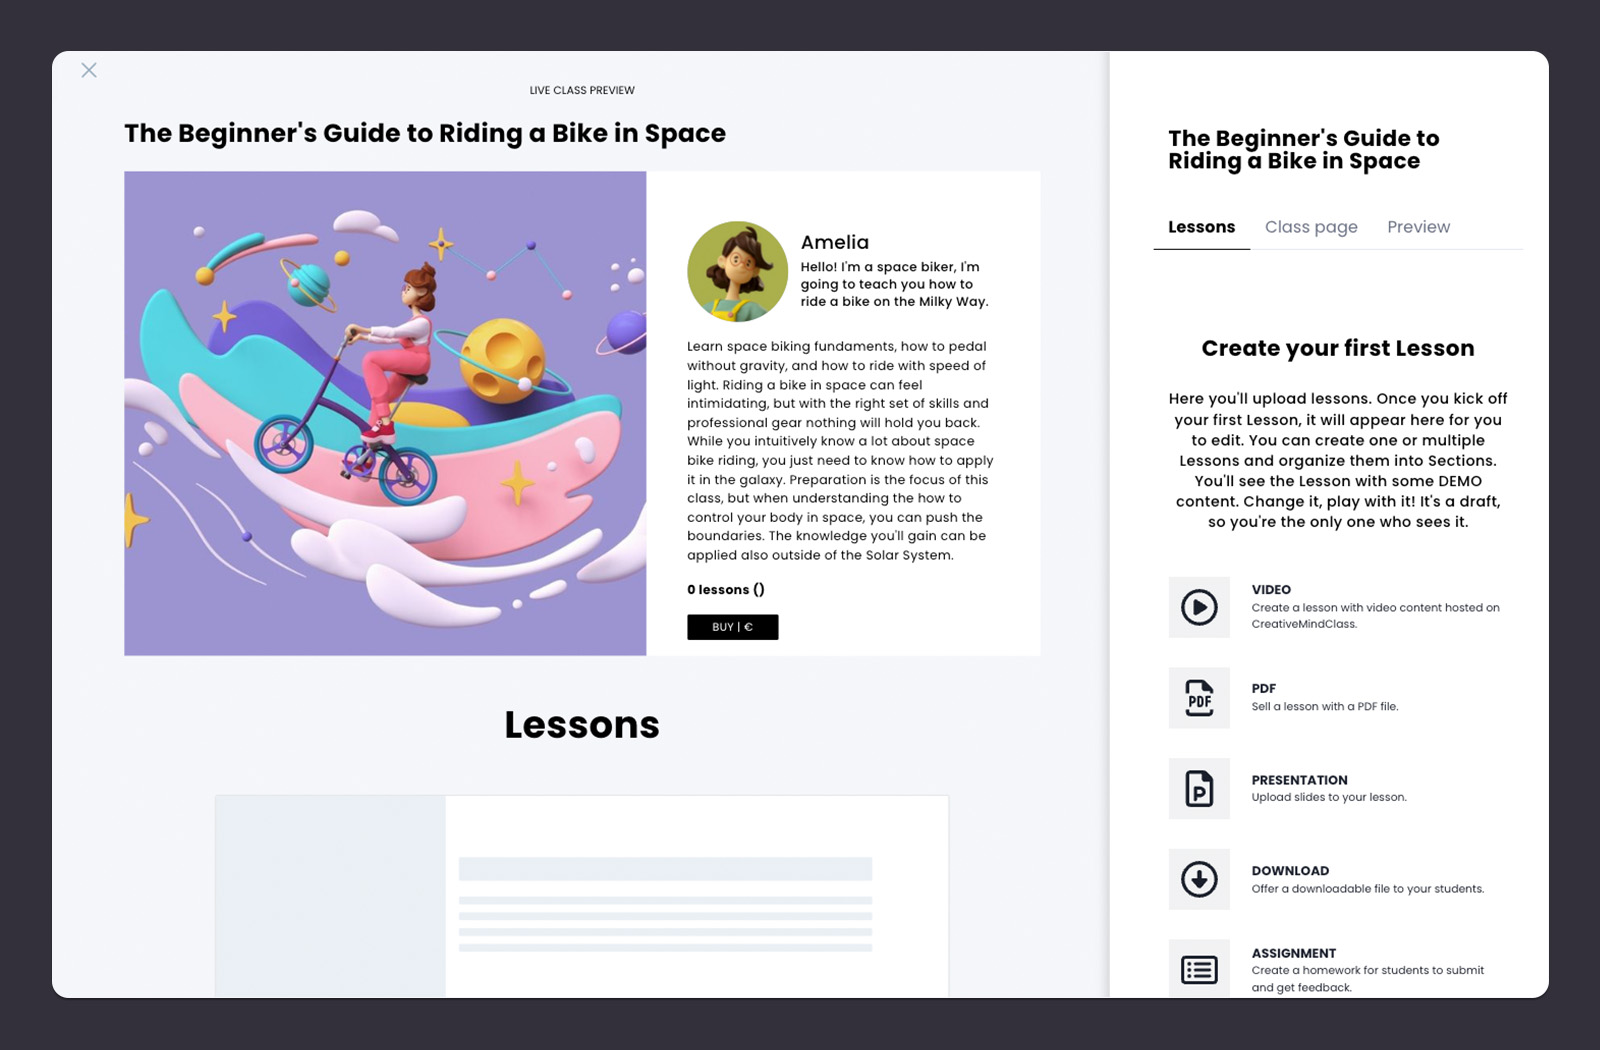
First, open the Class page
You'll find the Class page tab in the Class. Click the Class page tab to open it and start adding your course name and description.
How to do it in CreativeMindClass
- Click Class page tab to open it.
Specify what you should teach
What are you passionate about? What do you enjoy about it? What is it that people come to you for advice? What do you want to know more about? This will help you find a topic you are most comfortable with and make the course's creation time much less stressful.
Name your course
A clear, catchy, and benefit-focused title helps people to make an easy decision. It draws readers' attention and prompts them to say, "Yes, I'm ready to buy it!". Use powerful words to trigger emotions and the reaction that will make them read, click and buy.
How to do it in CreativeMindClass
- Type CLASS TITLE to name your course.
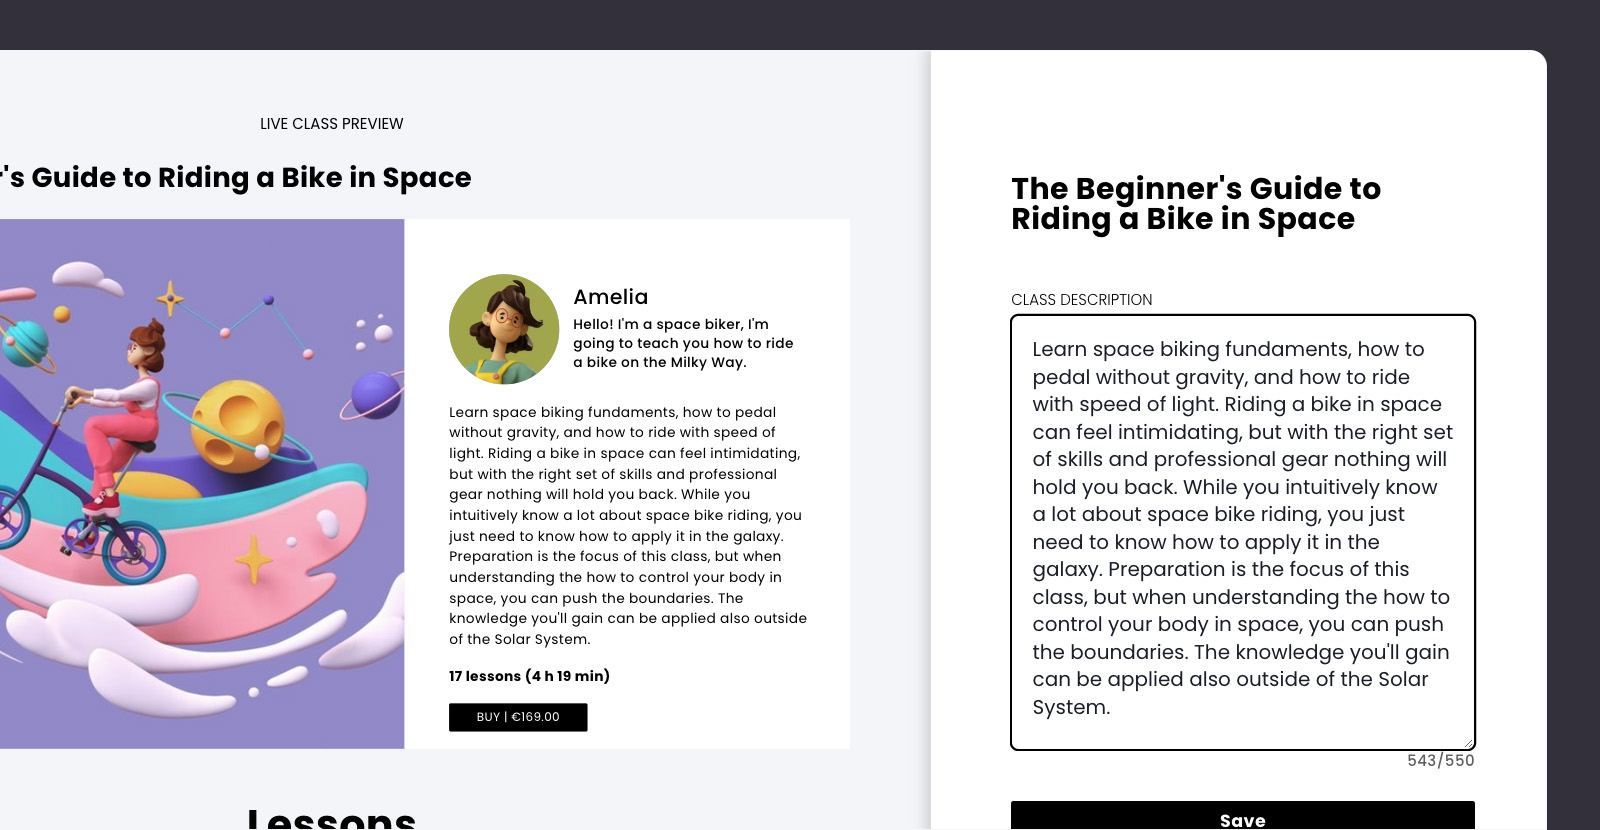
Craft an offer (and find people who will buy it)
What will people learn from you? Who is most likely going to attend this class? What specific problems do you solve? Are there competitors who offer similar courses? As you work on crafting the offer, find someone willing to pay money to learn about it.
How to do it in CreativeMindClass
- Type CLASS DESCRIPTION to communicate your offer.
You’ve finished the course topic!
Now that your course topic is complete, you have a powerful and realistic offer for your online course. Remember, you can create multiple classes to explore and test different course topics.
Next, we'll create a course plan so you won't miss a thing during the video recording...
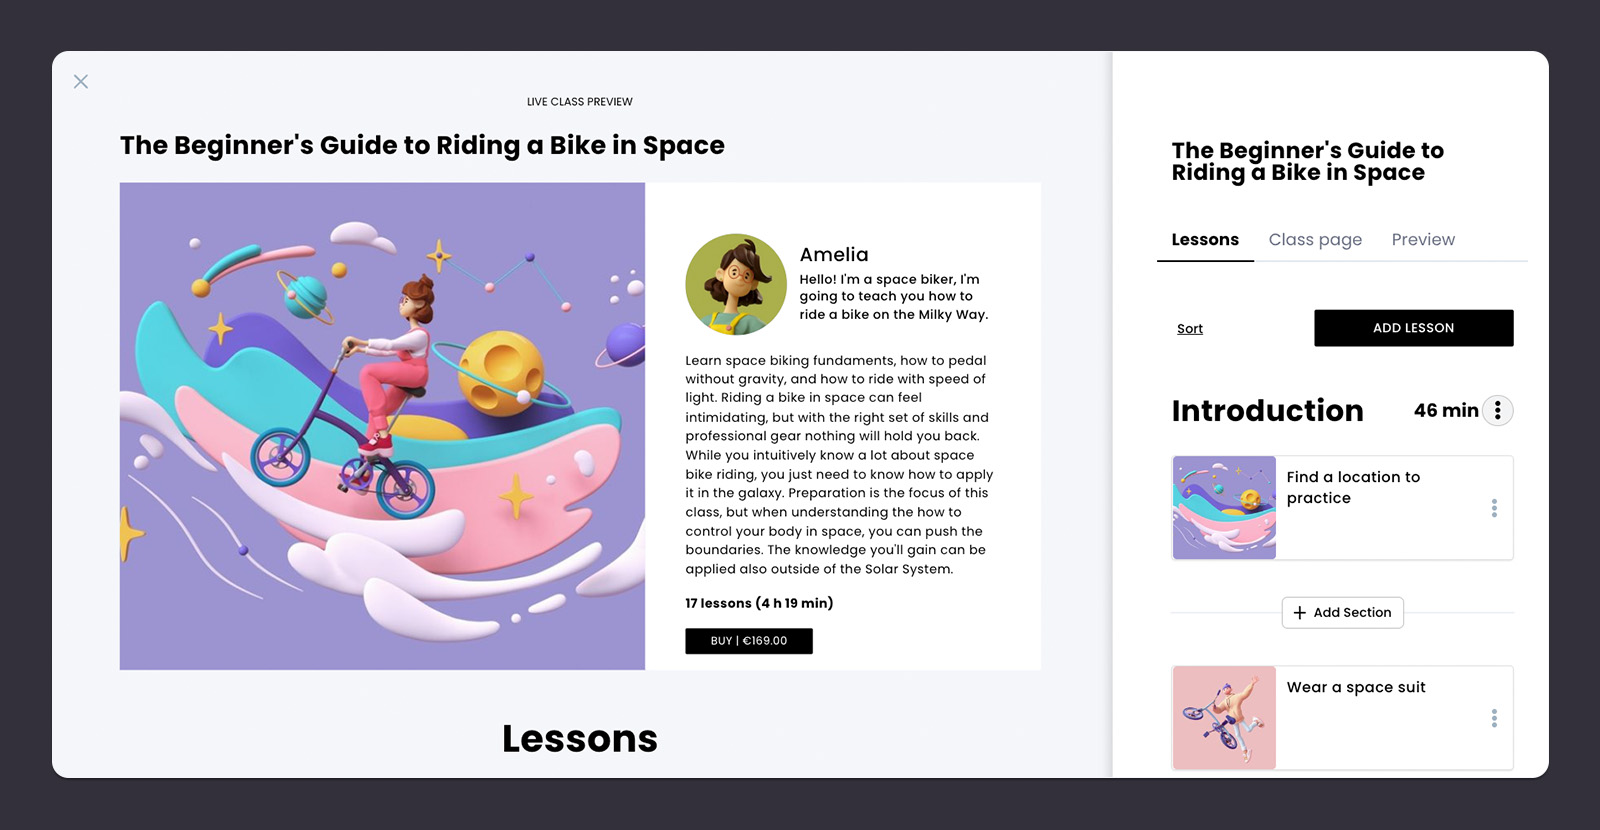
3. Course outline
Plan each lesson you need.
Planning the entire online course can be overwhelming. Designing the content creates a risk of confusion in selecting what should be included in the course. But a clearly defined course outline will make sure it's doable.
An online course outline is like a do-to list of each video you want to record. It typically contains a list of specific lessons with notes about content details and learning outcomes, so you don't miss a single thing on the day of filming the course.
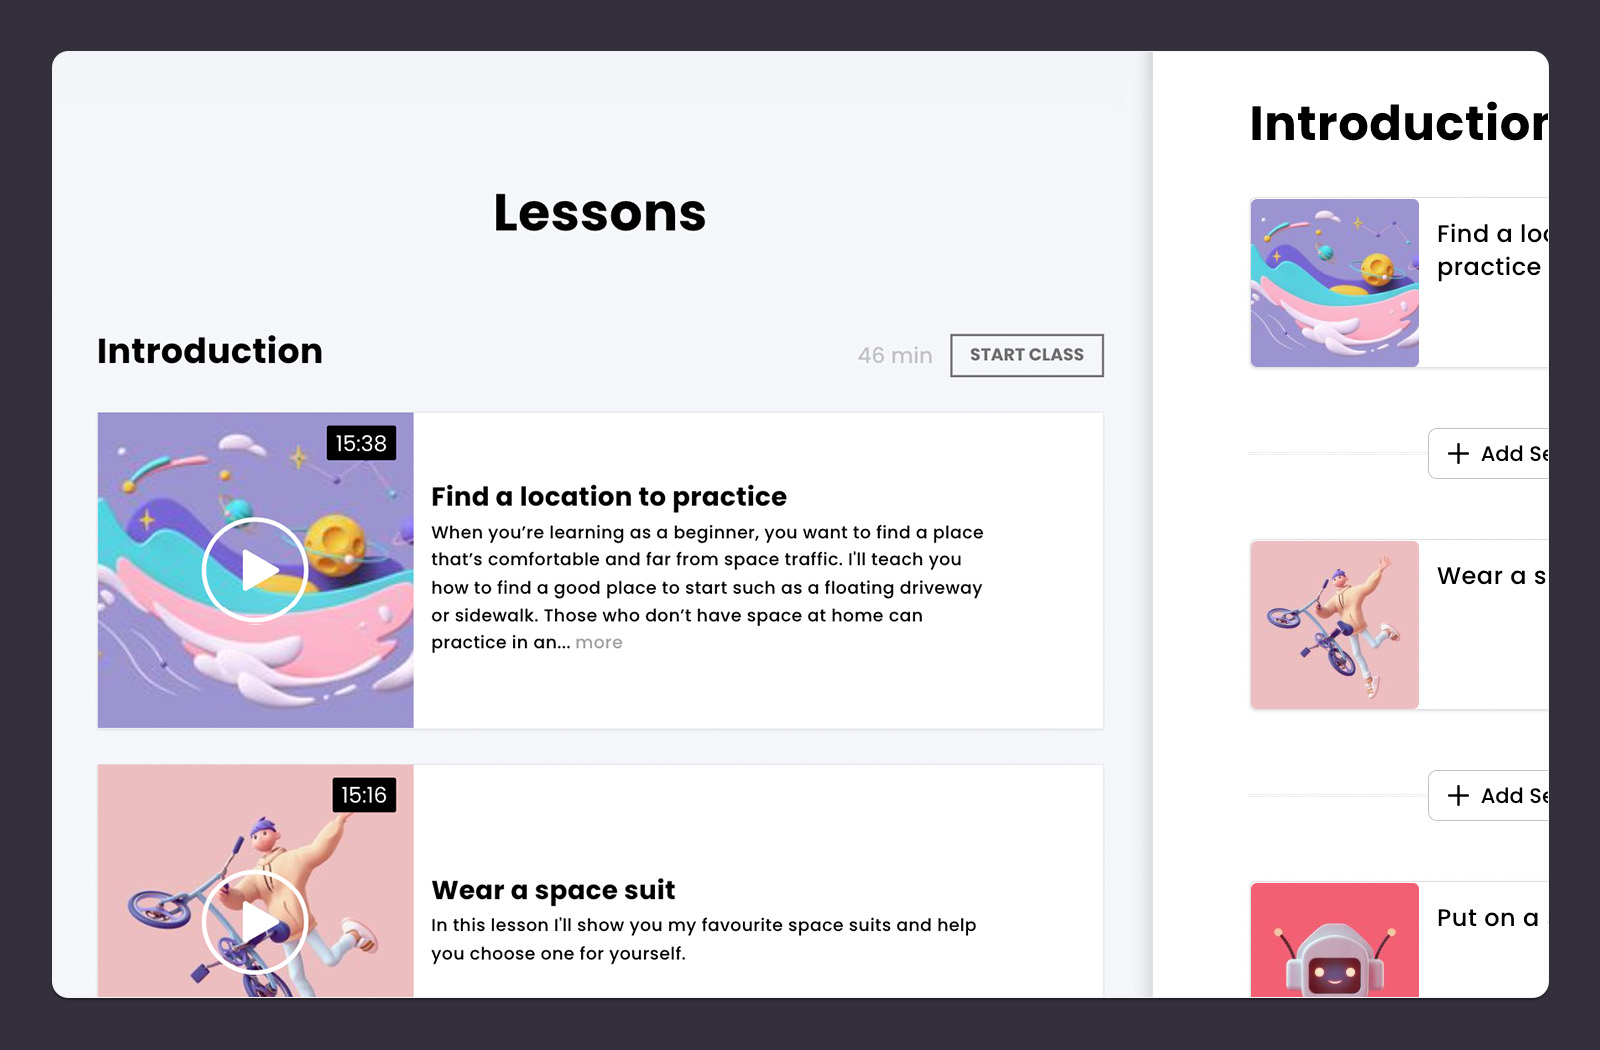
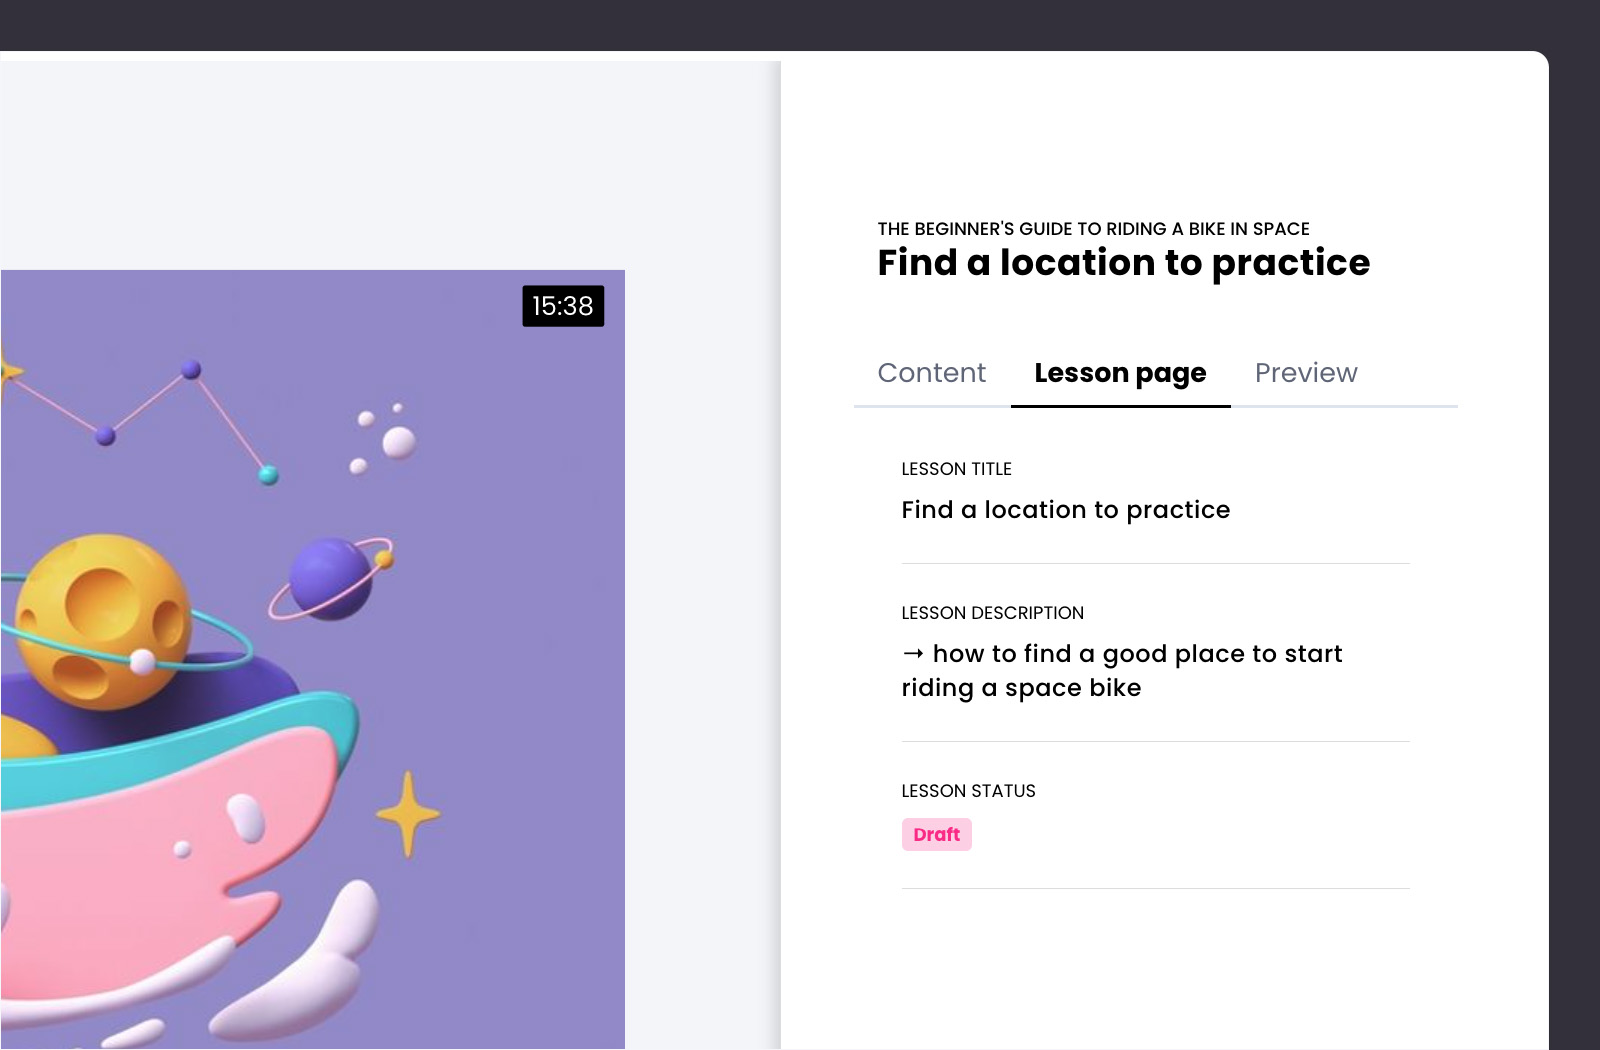
First, open the Lessons
You'll find the Lessons tab in the Class. Click the Lessons tab to open it and start adding your lessons.
How to do it in CreativeMindClass
1. Click LESSONS tab to open it.
List the things you're covering
Start by listing the core subjects and elements you want to cover. These could be introducing yourself, course overview, hands-on project, and conclusion. Don't get into specific details yet. What could you cover in 3-10 minutes video lessons?
How to do it in CreativeMindClass
- Click ADD LESSON button to create a new lesson.
- In Lesson page tab, type LESSON TITLE.
- Add 10-20 lessons to your course.
List the individual learning outcomes
This is the heart of the course outline. It's where you write down all the most important points for each video you want to record. Consider specific learning outcomes and content that answers your audience's needs and determine the gaps your competitors don't address.
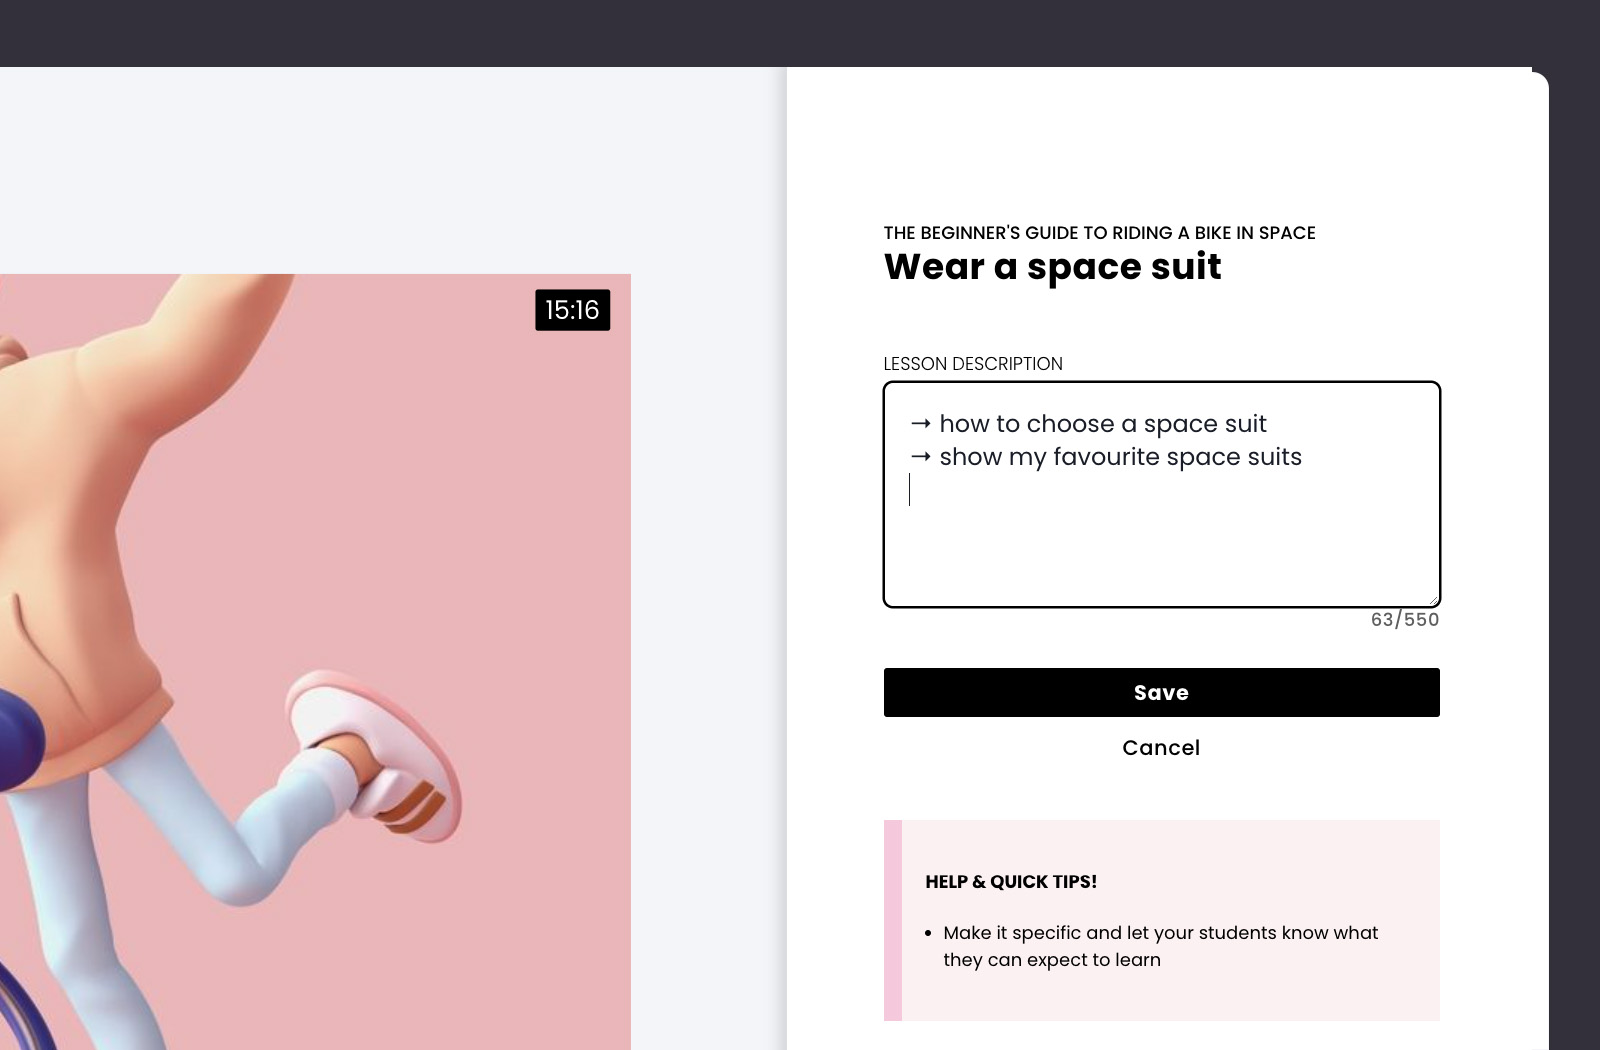
How to do it in CreativeMindClass
- Navigate to "Course overview" lesson.
- Type LESSON DESCRIPTION to create your lesson outline.
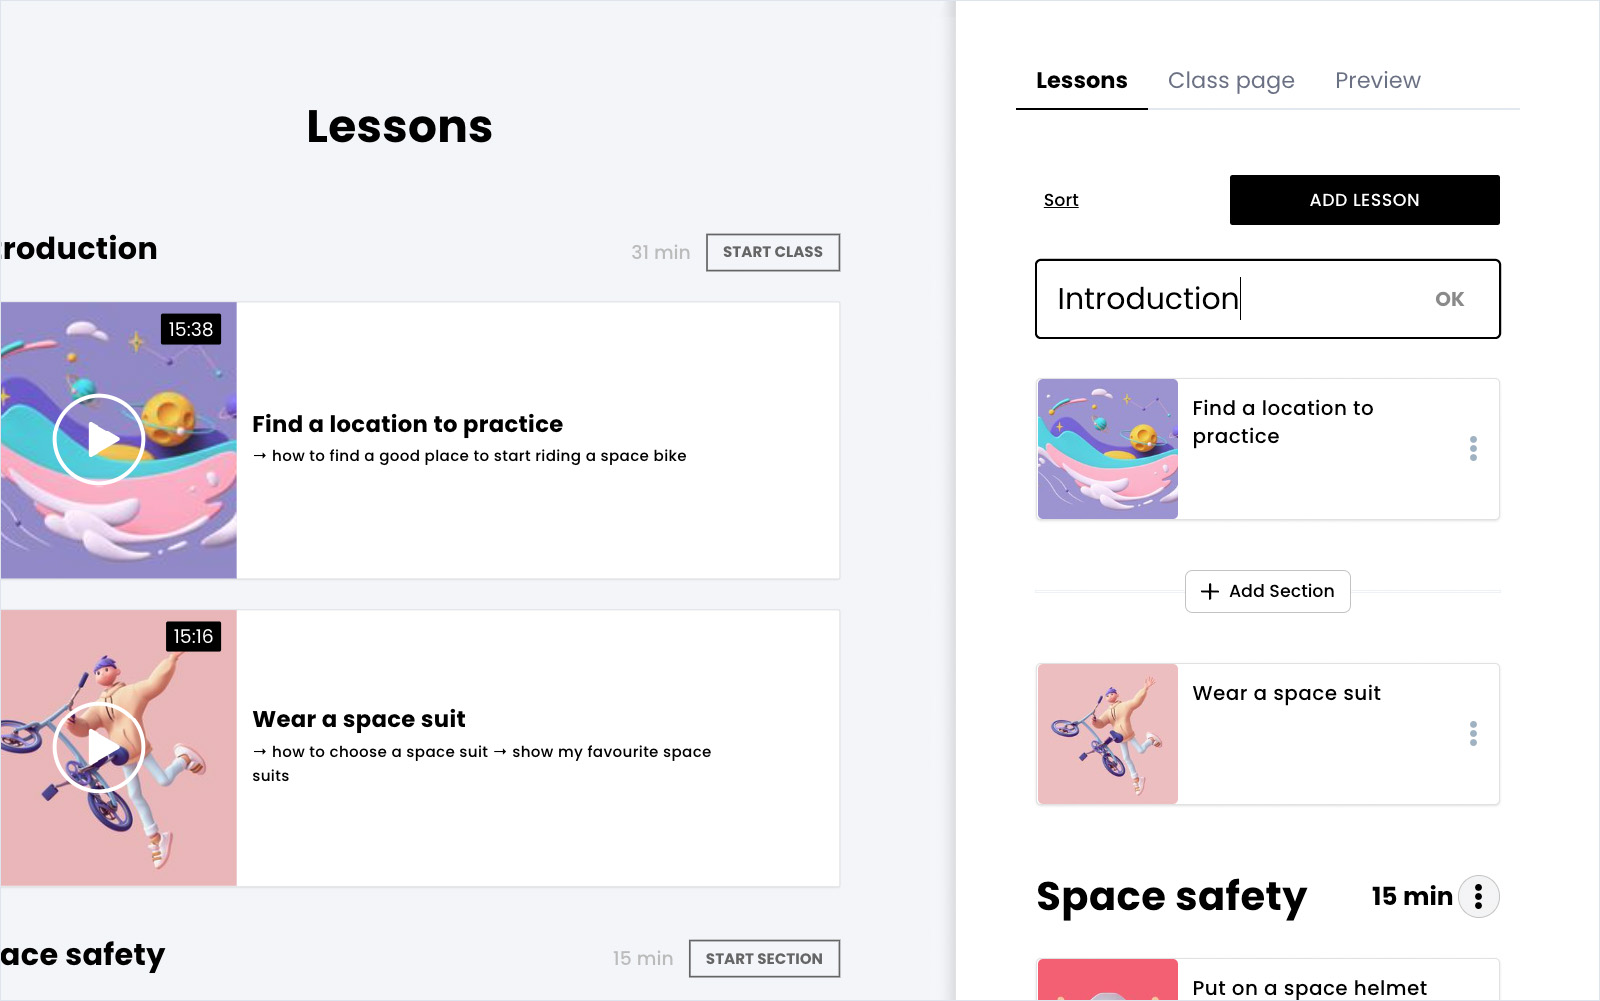
Go from messy to organized
You may have written the lesson plan that you've found to need to be shorter or more clear. If that's the case, consider breaking your course into sections. You can remove the lessons with no clear outcome for learning. Try to be ruthless at this stage so it can be a manageable exercise.
How to do it in CreativeMindClass
- Click Add Section button to create a section.
- Type Section title.
- Add more sections to group your lessons.
Reference it on the video recording day
Traditionally you'd print out your to-do list to refer to on the filming day. But these days, a to-do list can be accessed on phones or laptops. This way, you can check off each lesson or adjust it as you need.
You've finished the course outline!
Now that your course outline is complete, you have a clear plan for your video recording.
Next, we'll discuss how to deliver and record your content...
4. Content delivery
Prepare videos, downloadable files, and exercises.
It's time to think about how to present each part of your online course. Videos are the most engaging way to present your content.
Video lessons contain interactive and fun content, which gives a great learning experience for online students. The most effective way to deliver learning outcomes is to mix multimedia: videos, screen recordings, presentations, audio, hand-outs, and exercises.
Look at your course outline. What method fits best to deliver the learning outcomes of each lesson?
First, open the Lessons
You'll find the Lessons in the Class. Click the Lessons tab to open it and start adding multimedia for each lesson.
How to do it in CreativeMindClass
1. Click LESSONS tab to open it.
Add a video to each lesson
Videos are the most engaging way to present your content. Videos can have different forms, like presentations or screen recordings with audio, so it doesn't mean that you need to be in front of the camera all the time.
As a photographer, you have the advantage that it might be easy for you to pick up a video camera and start shooting. These videos can be made using the gear and shooting space right at home with the skills you already have at your fingertips.
When you're done recording and editing your videos, you have multiple short, 16:9, high-quality video files to upload. Keep in mind the high quality of the video. The resolution must be 1080p.
How to do it in CreativeMindClass
- In LESSON, select VIDEO lesson type.
- Drag a video file from your computer.
- Add a video to each lesson.
Create a learning experience that primarily focuses on videos
A video course is an entirely different learning experience than reading, for example, text on a slide presentation. It needs certain features, navigation, and layout specific to video platforms. CreativeMindClass is an online course platform dedicated especially to video-based courses and focused on providing an enjoyable learning experience by using a video.
Usually, when a video is uploaded on a platform, it's a good practice to add a custom thumbnail. It looks great in the preview, however, it adds some extra work. We came up with something that looks cool without you doing the extra work. We pick the highlights when you upload your video and show a looped 3-8 seconds video. It's something you might know from Spotify videos shown while a song plays.
How to do it in CreativeMindClass
- In LESSON, select VIDEO lesson type.
- Drag a video file from your computer.
- Go to Preview and enjoy the automatically generated lesson cover video.
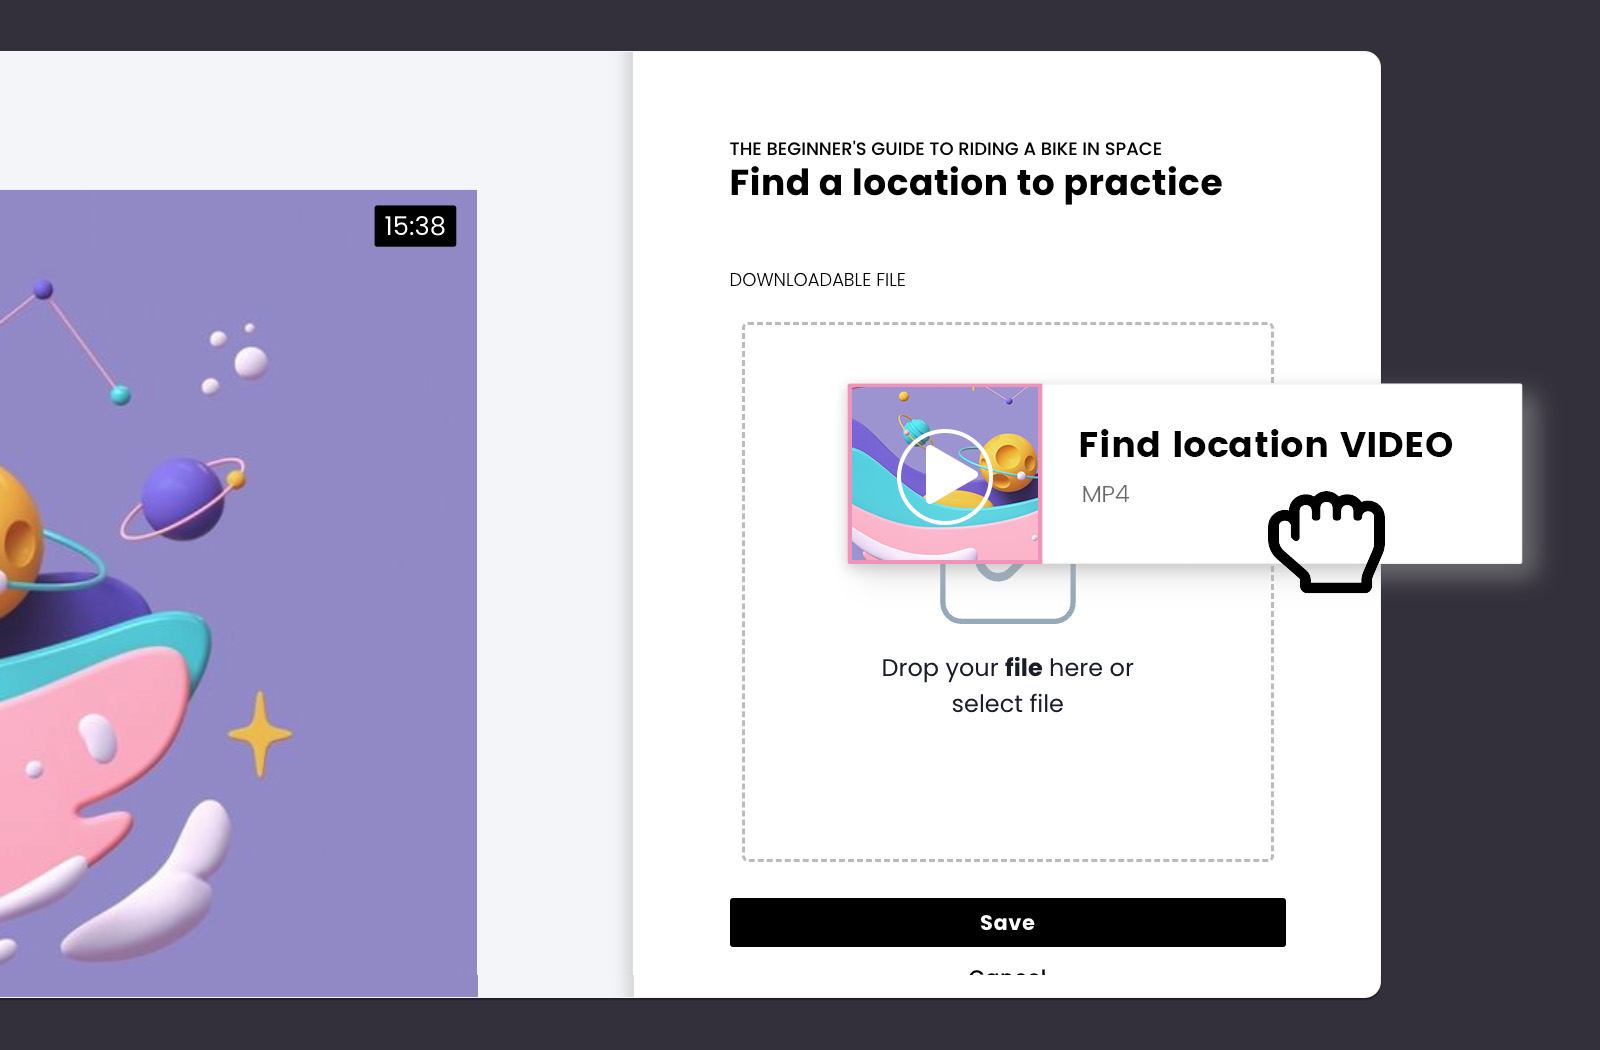
Add a downloadable file
Downloadable files are a great addition to your lesson. Downloadable files make your content fun and engaging and leave your mark on students' pulpits and desks. When you upload an additional file to your lessons, your students can download it, print it out, fill it in, or edit it.
You can create video lessons with additional files like printouts, worksheets, documents to fill in, editable native files, or extra video files.
When you're done creating your downloadable files, you have high-quality image files or editable native files to upload.
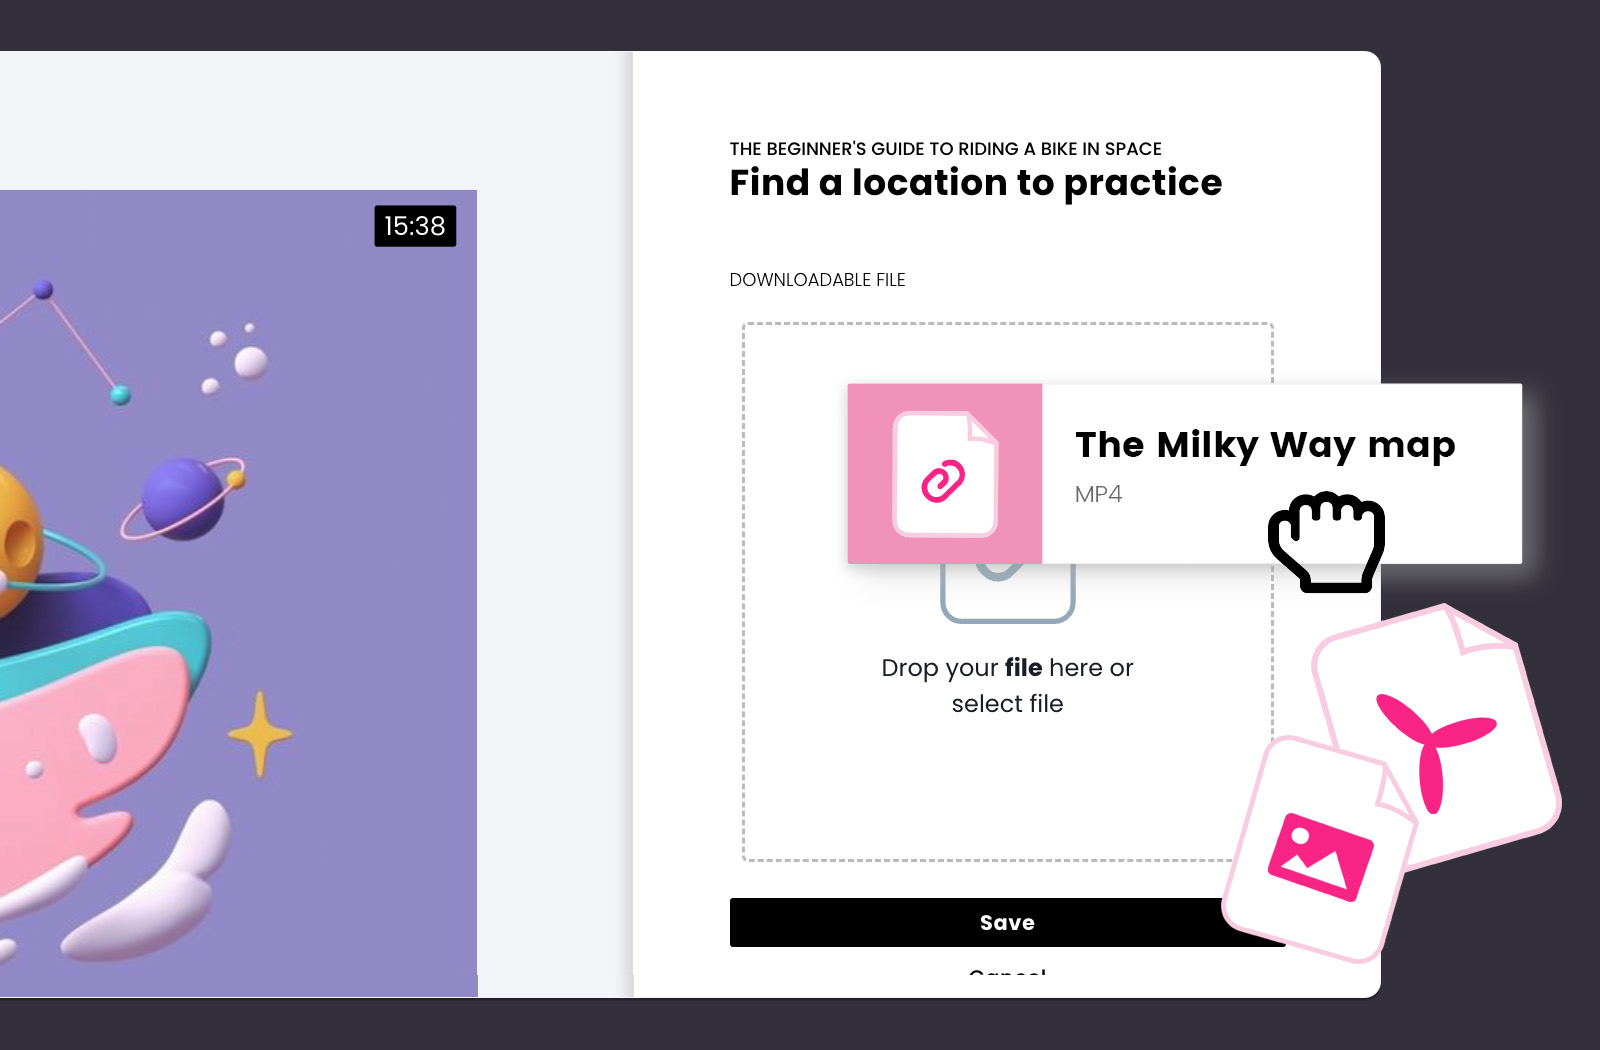
How to do it in CreativeMindClass
- Navigate to LESSON → Content tab
- Click DOWNLOADABLE FILE to upload your file.
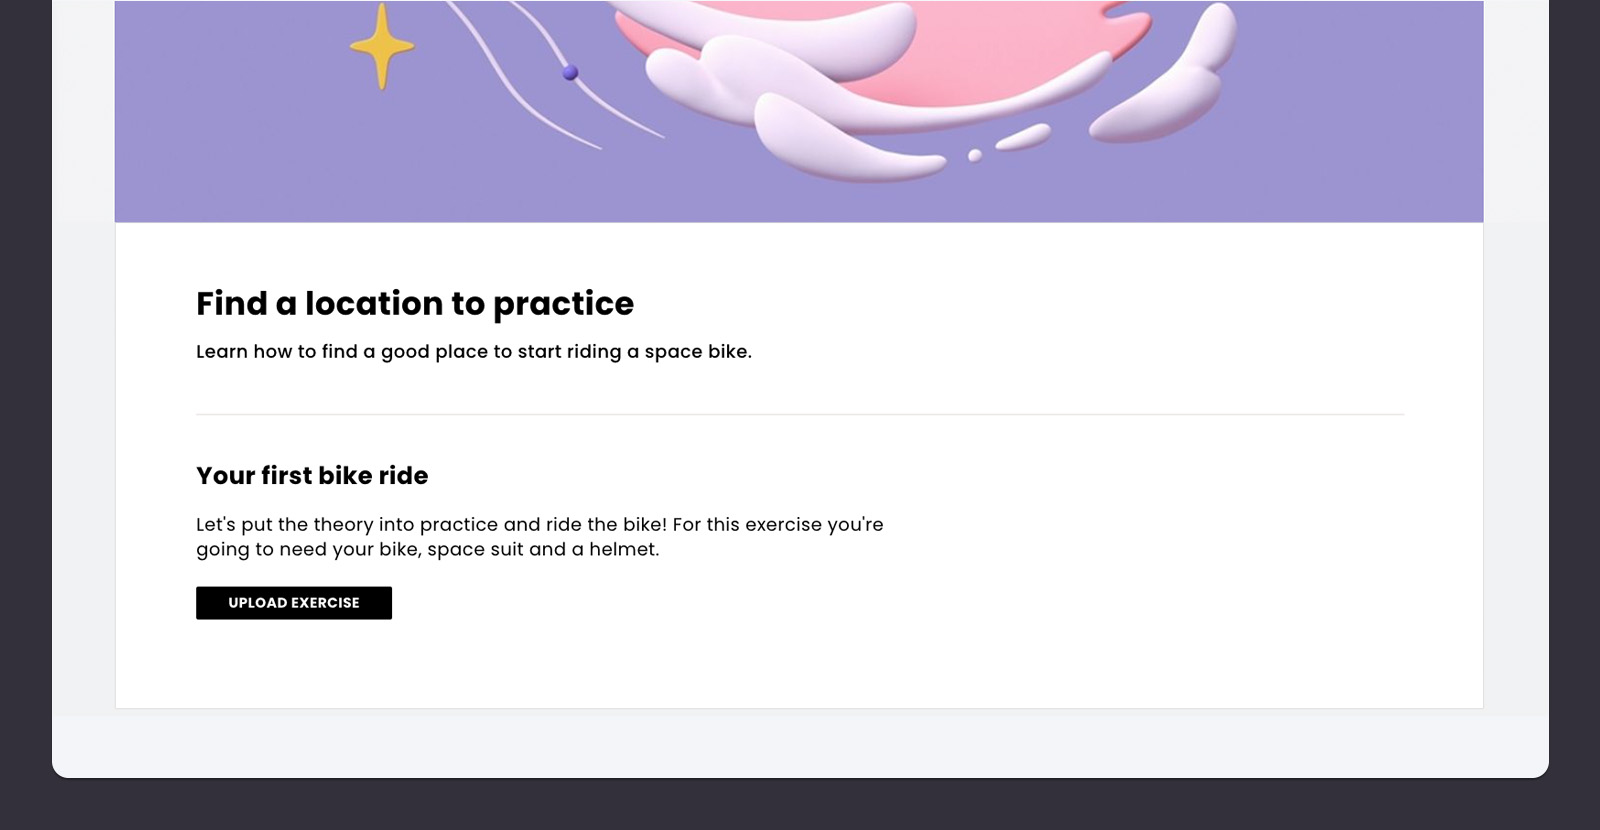
Add an exercise to a lesson
Exercises are a great way for your students to put theory into practice. They engage them in learning by doing. Such active learning typically consists of an actionable task and instructor feedback.
Think about a learning experience you could create to help achieve their goals. Look at your Lessons list. Which lessons could have an engaging and fun activity as a learning method? Which lessons could have homework assignments? What brainstorming exercises could you include? What is the final project in your course?

How to do it in CreativeMindClass
- Navigate to LESSON → Content tab
- Click EXERCISE to create an exercise for your students.
Ask students to share their assignments and get your feedback
Some online courses ask for a class project. Your students can apply the skills they learn during your course to complete the project. You can ask them to upload their project to get feedback.
How to do it in CreativeMindClass
- Navigate to LESSON → Content tab
- Click EXERCISE to create an exercise.
- Type TITLE.
- Type DESCRIPTION.
- When your student uploads the exercise, navigate to Students' works to you give your feedback.
Build an online community around your course
Sharing your feedback with students is the first step towards building a community around your online course. You can take your students learning experience to the next level growing your business and boosting your brand reach at the same time.
Online community drives traffic to your online course website, helps you retain customers, and increases your revenue. Activity Feed is a place where you communicate with your community using posts.
Add some motivational posts to your online course experience. You'll get yourself a great base for building a highly engaged community around your business and brand.
How could you keep your students interested? What do you usually post on social media? What tricks and practical tips could you share? A good idea to keep your students engaged and motivated to complete the course are daily posts with inspirations for the final project.

How to do it in CreativeMindClass
- Click My Posts in main menu to open it.
- Click ADD POST button to create a new post.
You've finished preparing the content!
Now that your content is ready, you have a powerful online course. Next, we'll write copy and upload visuals to your course website...
5. Course website
Persuade your audience to buy with text and visuals.
A clear, benefit-oriented website will convince people to buy your course. Why should someone choose your course over another? What is a promise you make to your customers?
An online course website typically includes attention-grabbing copy and visuals representing the main benefits closed with a clear call-to-action.
First, open the Website
Click on the Website to open it and add your headline, visuals, and copy.
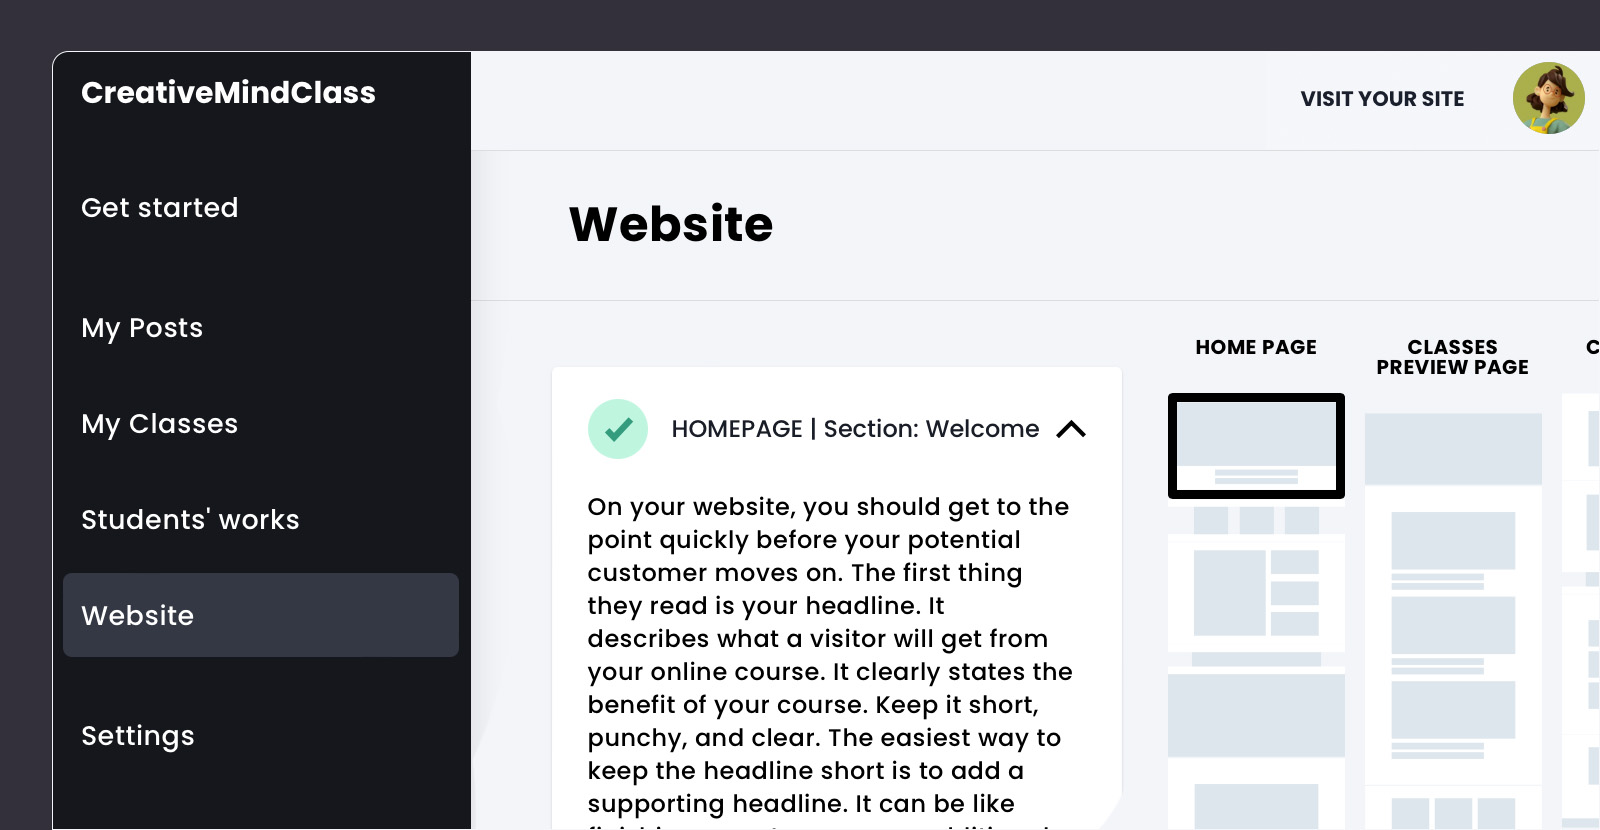
How to do it in CreativeMindClass
- Click Website in main menu to open it.
Grab the visitor's attention
On your website, you should get to the point quickly before your potential customer moves on.
The first thing they read is your headline. It clearly states the benefit of your course and describes what a visitor will get.
Keep it short, punchy, and clear. The easiest way to keep the headline short is to add a supporting headline. It can be the end of the headline sentence or an additional sentence supporting the primary statement.
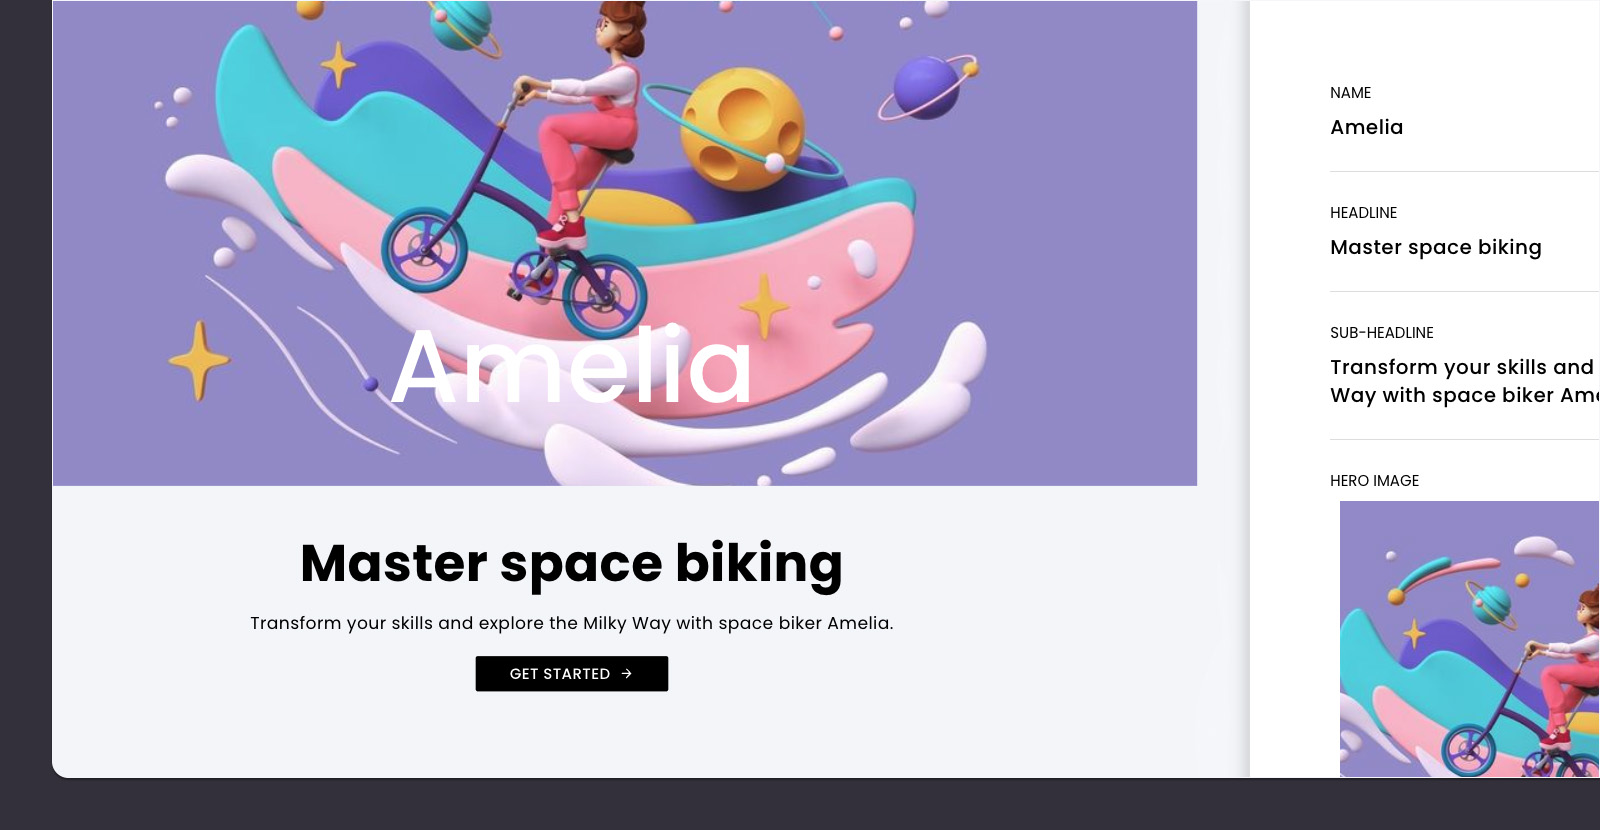
How to do it in CreativeMindClass
- Click Edit button on Welcome section.
- Type HEADLINE.
- Type SUB-HEADLINE.
Add inspiring visuals
Help readers understand your offer with the hero image (or background video) placed on the top part of the course website. What does the hero image say about the benefits of your online course? Place your potential customer in a scenario you've prepared for them. The visuals should be large, crisp, and high-quality.

How to do it in CreativeMindClass
- Click Edit button on Welcome section.
- Click HERO IMAGE, BACKGROUND VIDEO or ANIMATION to add your visuals.
Introduce your course
Give some basic information about your online course. What does it do? How long is it? How many lessons do you offer? Do you give any bonus materials? What's the class project? Who is the course for? This helps the visitors who skim through your page quickly understand what they're buying.
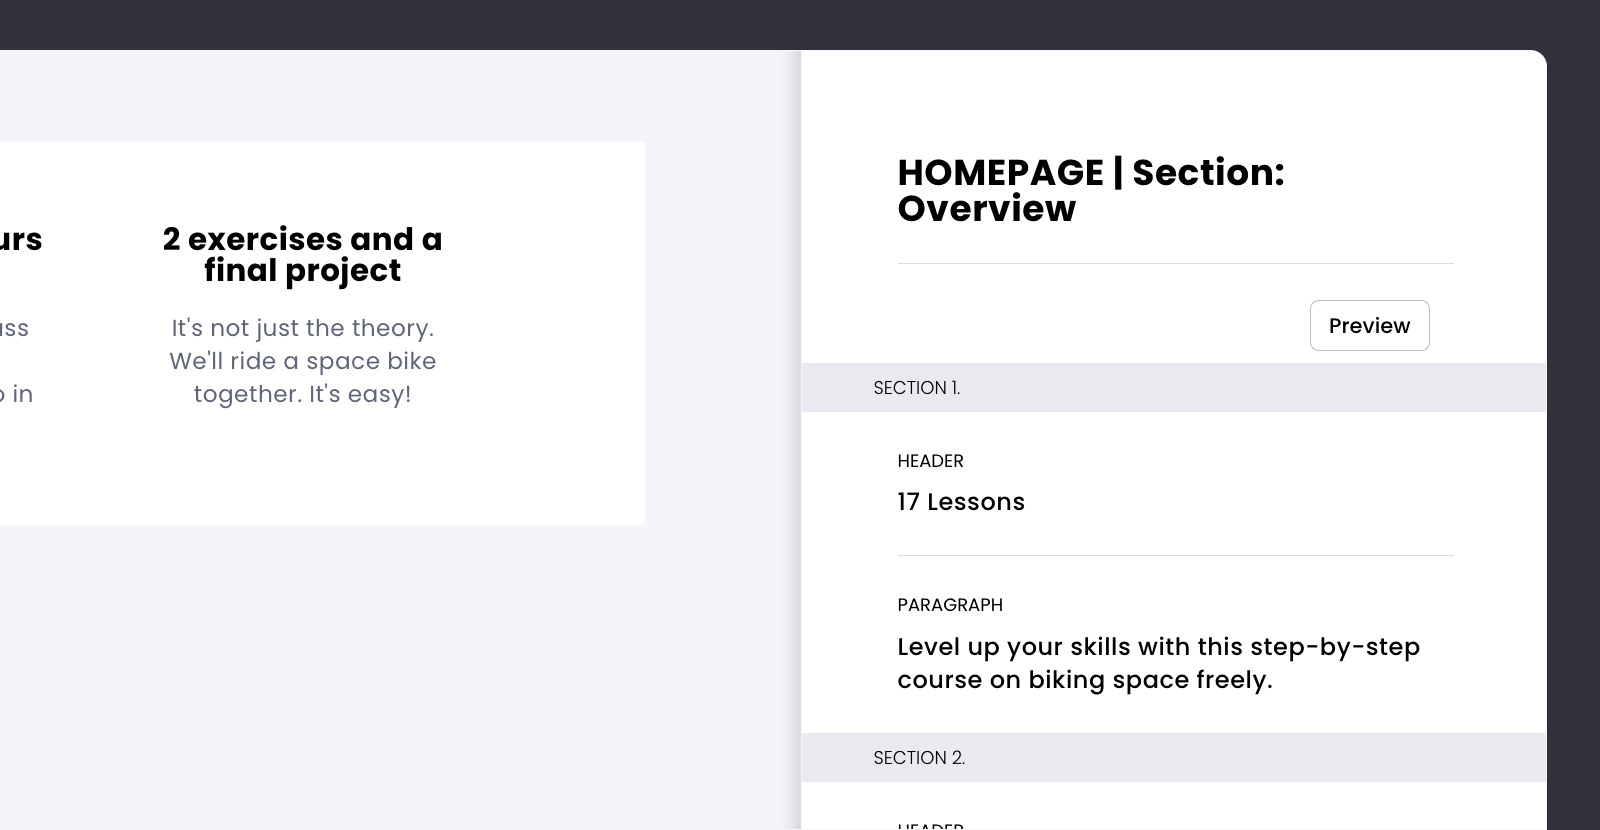
How to do it in CreativeMindClass
- Click Edit button on Overview section.
- Type HEADER.
- Type PARAGRAPH.
Highlight benefits
Clearly stated benefits persuade most people. Provide additional details about the learning outcomes and its value. What skills will students learn? How would the course benefit them? What is the transformation they will go through? What high-pain problems do you solve?
The easiest way to highlight benefits is to write a short and clear header. Then, add a sub-header supporting the primary statement. In the paragraphs, write about the key learning outcomes, and describe shortly the value you're providing.
Another way to highlight the benefits of your course is to use an eye-catching photo.
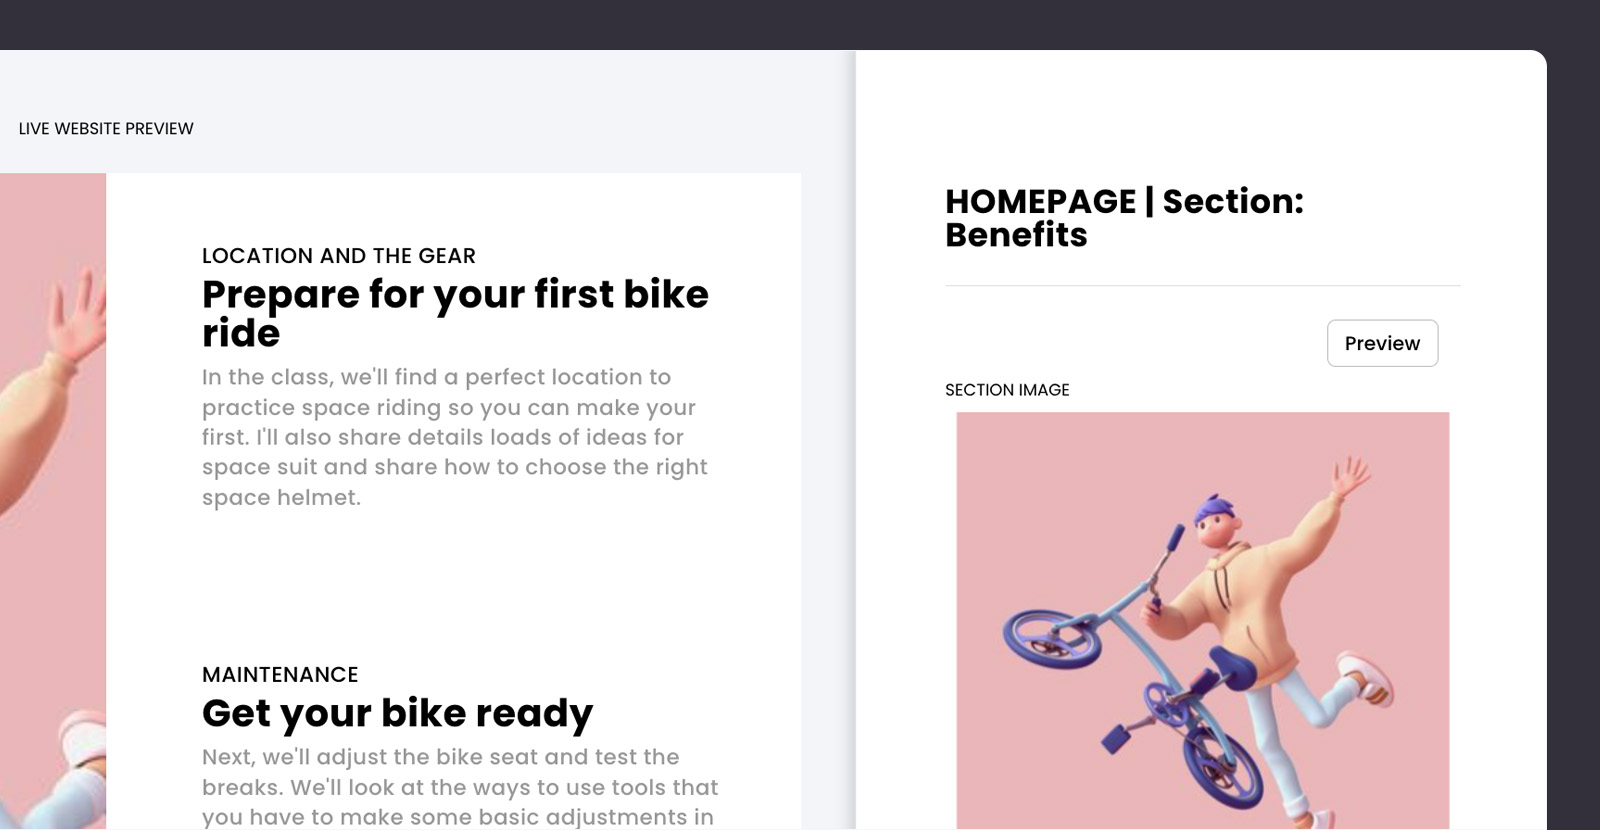
How to do it in CreativeMindClass
- Click Edit button on Benefits section.
- Type HEADER.
- Type SUB-HEADER.
- Type PARAGRAPH.
- Click SECTION IMAGE and upload your image.
Give a taste of your course
Someone who is considering buying your online course wants to get a sneak peek of what's inside. You can present what your course is about in a cool promo trailer. For a promo trailer, you can create a dynamic video of 30-60 seconds.
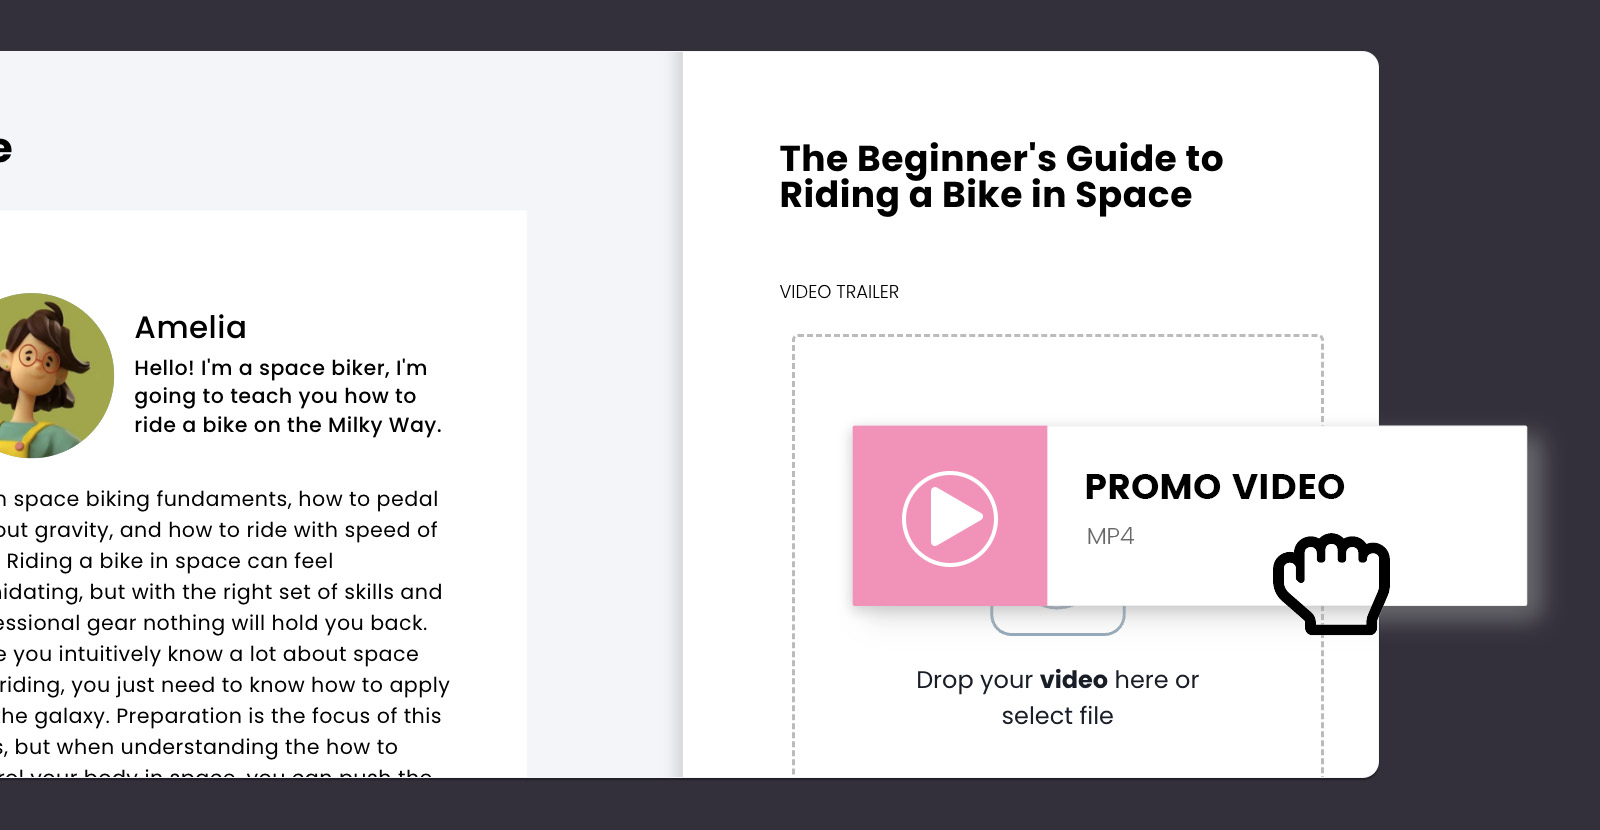
How to do it in CreativeMindClass
- Click My Classes in main menu to open it.
- In Class, Click Class page tab to open it.
- Click VIDEO TRAILER to upload your promotional video.
Share it with your audience
Congratulations! Once you've prepared your course website, your online course creation is completed. This is an exciting moment after all the hard work.
But another type of work begins! It's time to share it with your audience. Insert the link to your website, social media, email, or blog, and start the promo campaign.
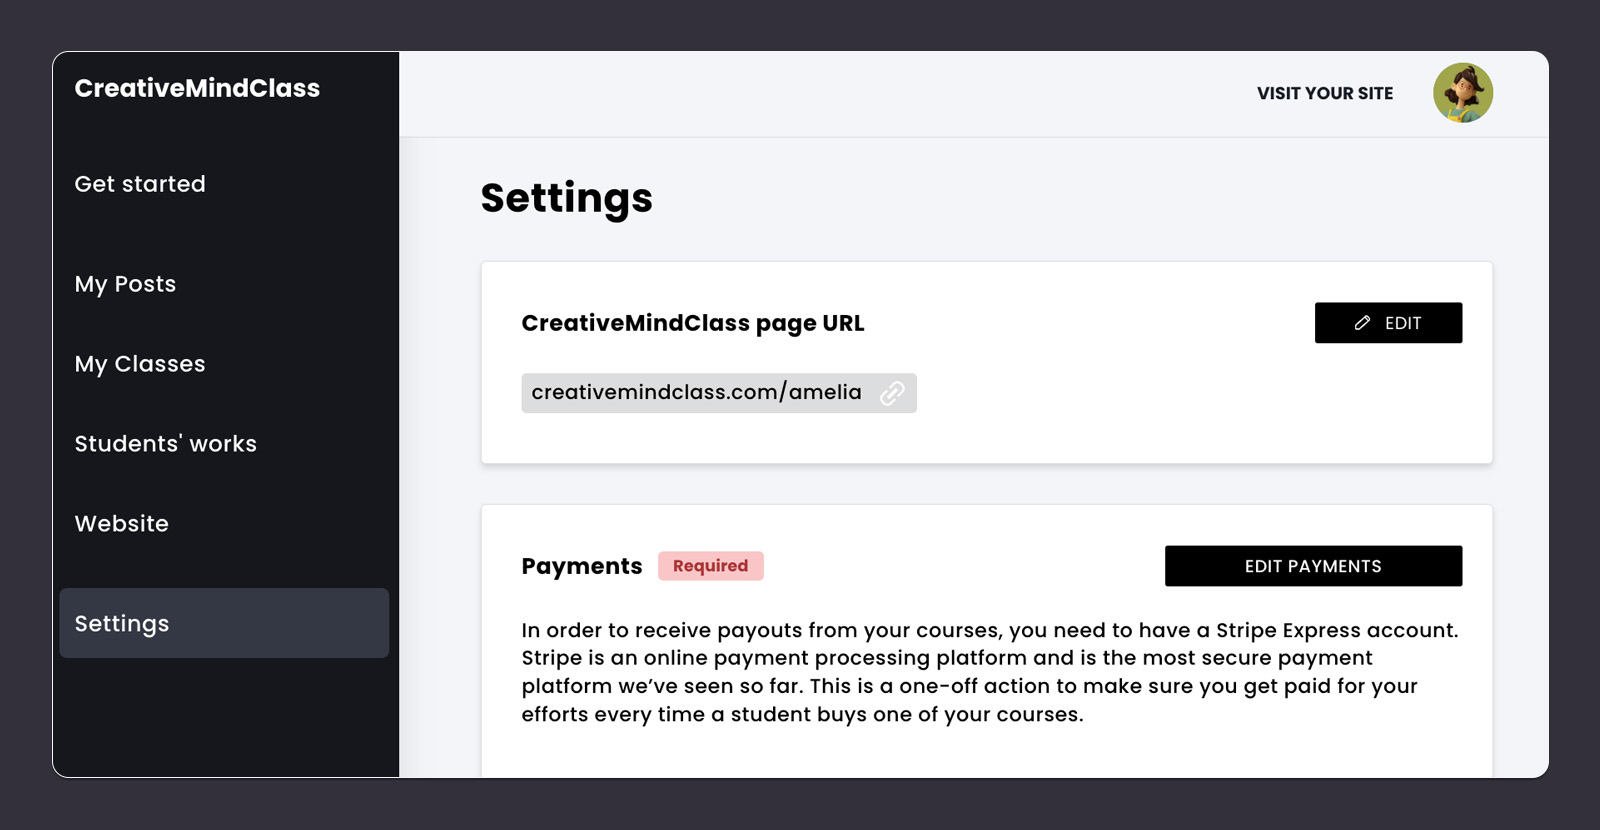
How to do it in CreativeMindClass
- Click Settings in main menu to open it.
- Copy CreativeMindClass page URL.
- Share the course with your audience.
You're all done!
Hopefully, this guide helped you become more organized and gave you the space to let you create a great learning experience for your students.
If you are starting a new online course, use the template below to get set up in minutes. The template is the ultimate time-saver when creating an online course. It's designed to convert (sell your course), and it's got all the essential elements—it's just waiting for your finishing touch. Slap on your photos, update the copy and visuals, and bam! You've just created an effective online course. It's really that easy.
Create your online course. Today.
Get started for FREE with our template.
Sign up for free with no time limit


